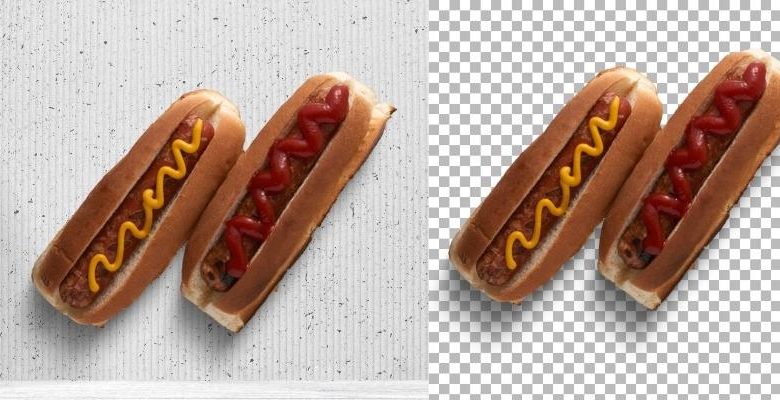
Images are the key to reaching customers’ hearts in the eCommerce business. A product image shouldn’t have any distraction that leads your eye away from the product and background plays a significant role in this case.
While an ideal background can grab your attention and let you focus on the product, a messy or distractive background does the opposite. That’s why we should learn how to remove the background and make it transparent so that the eye only focuses on the product.
Though there are many professionals who can help you remove transparent backgrounds, it’s no loss if you learn the method by yourself. So, do you wanna know how to remove transparent background?
In this article, you will learn about two different ways to remove transparent backgrounds. Also, using the method you will be able to remove white background photoshop. So, let’s explore!
How To Remove Background by Using Adobe Photoshop
If your product photo has a colored background that is not suitable, you can make it transparent. For that, you have to convert the file into PNG format. To transfer images, a PNG format has been designed. Anyway, you can do the background removal on Adobe Photoshop. So, let’s see how it goes.
Open the Image File
First, open the image file to Adobe Photoshop.
Put on a Transparent Layer
To put on a transparent layer, you have to select “Layer” from the menu. And then go to “New Layer”. Also, a square icon can be found in the layers window, you can click on it.
Doing previous steps, you will get an automatically transparent new layer. You have to drag this transparent layer under your images’ layer.
Then select the content layer.
Delete the Background
The desired transparent area of the image is needed to be selected at this step. Select the area by using a lasso tool or magic wand. You can use different tolerance settings to see what setting can lead you to your desired result or you can use 32 as a tolerance setting.
Then click on the delete button. You will see a checkered background of gray and white color which is the indication of the transparent background. It means the previous background has been removed.
If there is any square or circle shape in the image that is disconnected from the image shape, you can simply follow the steps above to remove the background inside the shape too.
Save the File As a Transparent PNG Image
Now, it’s time to save the file. To save it, you have to go to “File” and then go to “Save As”. Then select “PNG” to save your file as a transparent PNG image.
Though the background of the image is checkered in Adobe Photoshop, it will be transparent in the PNG file. So, without any worry, you can upload this image with a transparent background on your website.
Get to Know About: Ways to change the background color
How to Remove Background Using Gimp
In case you’re looking for a way to remove backgrounds from your photos quickly and easily, GIMP is the perfect program for you.
GIMP is a free and open source photo editor that’s used mainly for removing backgrounds. It has a variety of features that make it ideal for this purpose, including the ability to select multiple objects and resize them easily. You can also use filters and transitions to add effects, and share your work online quickly and easily using the built-in web gallery.
To remove background using gimp, follow these simple steps:
1. Open gimp program and make a new file.
2. Then select the photo that you want to remove the background from.
3. Then open the Options menu and Click on the Background button (it’s near the top-left corner of the screen).
4. From here, Select the area you want to replace the background with your own image.
5. Click on the OK button to apply the changes.
Voila! Your photo will now have a clean background without any pesky backgrounds.
How to Remove Background Using Snapseed
If you want to remove background from a photo or image, then you can use the free and easy-to-use snapseed application.
First, open up snapseed and select the photo or image that you want to remove the background from. You can then select the area of the photo or image that you want to remove the background from. To make sure that everything is selected correctly, use the magnifier icon to zoom in on your selection.
Once your selection is perfect, simply click on the Clean Background button and wait for the background to be completely removed. If you find that anything else needs editing after removing the background, then you can always use snapseed’s filters to change things up a bit.
Remove Background by Using Canva
Once I needed to edit an image urgently and that’s when I found Canva. It’s a free program that is available on the internet and can be used through a browser. To use this site, you have to create an account there. By creating the account, you can save the designs and complete them later.
Well, Canva provides some services free of cost but for creating a transparent background, you have to get their Pro plan. Anyway, they provide a one month free trial, within that time you can edit or remove backgrounds freely!
Create a Design
Before uploading the image on Canva, you have to select the size and dimension you want it to be. You have to click on the button “create a design” where you’ll find several sizes like square, circle, etc.
You can select any size and dimension, but select one that will be suitable to your product image.
Upload the Image
You can simply drag the image and drop it to the left-hand panel. In this way, the image will be automatically uploaded and the progress can be seen in the tab named “Uploads”.
After finishing the upload, you have to add it to the design by clicking on it. Here, you can resize the image to fit in the design space.
Remove the Background Image
Now, it’s time to remove the background and make it transparent. If you click on the image, you will notice some menus. There you will find “Effects” and after selecting “Effects”, you will find “Background Remover”.
Now, click on that option and your background is removed. Isn’t it easy? Anyway, you can also add any different background to the image to check if your background is removed or not. After checking, go back to the transparent background before saving the image.
Download the Image
As you are using an online browser, you have to download the image. Go to the upper-righthand corner where you will find “Download”. After clicking on this, you will see a menu where you will find the file type.
For transparent background, you have to download the image in PNG format, also select the “transparent background” option before clicking on download.
Well, your image with a transparent background is ready to use for your website!
Final Thoughts
Removing the background is very important for a product image if you want to increase sales. It’s good that we have the knowledge to apply the process ourselves. As you now know how to remove transparent background, you will be able to do it yourself. But it’s quite impossible for someone to handle both the business and photo editing by himself. There are many professionals who can do this job in bulk at an affordable rate. Clipping Way is one of the services that are sincere to their job. However, I hope this article was helpful enough to accomplish your goal.